 I haven't raced cross country for a couple of years. Sadly enough you're looking at an MTBer turned roadie, yet recently my attention has turned back to living and experiencing the joy of an unedited version of myself.
And me likes to ride mountain bikes!
A couple of friends and I decided to kick off 2013 with a 24 hour race, and of course this means ditching the road bike for a while, dusting off the old girl, and getting out on the trails.
Years riding on the road have given me a high base level of fitness, and although the trails are tough, steep, technical and rocky, I realised I NEVER use my 22t chainring and rarely the big chainring either.
It got me thinking about single chain ring setups. Getting back to basics, the simplicity, the weight savings, and the coolness factor appealed to me and resulted in the plan to ditch my front derailleur and try a 1x10.
Having been out of circulation for a while I had no idea about the popularity of removing the front gears and running a 1x9 or 1x10 drivetrain, and seeing the possibility I went and bought the three parts I would need: A single speed chainring, a chain guide and some short chainring bolts from my LBS.
Now I'm ready.
1. Remove unnecessary parts
The first step is obviously to remove your front derailleur, cables and shift pods. Pull the cranks and take off the chainrings. I'm loving this...the weight is just falling off!
This is a great opportunity to clean everywhere as well. Take out the bottom bracket and clean out the shell, cups and surrounding area.
2. Attach Chainring
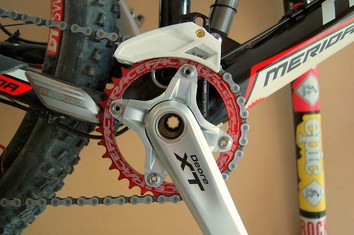
I bought a RaceFace 34t single chainring. It is important to use a single chainring as it doesn't have shifting ramps which on a multispeed bike are designed to help the chain slip easily between gears. Pointless once the front derailleur is removed and may result in the chain being prone to dropping. For $30-$40 a single chainring removes any concern.
I chose a 34t because I wanted a slightly bigger gear for racing. Mated to my 11-36 cassette I should have a very usable range.
Attach the chainring to your crank spider with short single chainring bolts. I avoid the funky anodized alloy versions as they can "creak" quite a bit (bad experience) and just stick with steel.
3. Attaching and spacing the chain guide
 This is the part that seems to cause people grief. I have a good "bike brain" from too many years in a bike shop and had no trouble. The biggest issue probably relates to an individual bike's compatibilty to be changed to a single chainring setup. If unsure, pop into your LBS and ask.
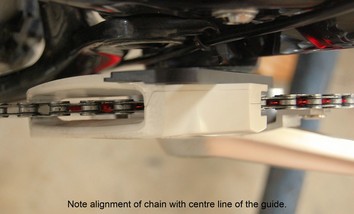
My bike is a Merida 120mm dually, with a 10 speed Shimano XT drivetrain and cranks. The chain guide is an E*Thirteen XCX BB mount with three spacers supplied. The spacers and guide sit behind the bottom bracket cup and adjust the position of the guide so the chain and chainring run perfectly centered.
This does require some trial and error. The only way is to place a spacer and the guide, tighten the BB, attach crank, check chainring alignment, if it's not right remove the crank and BB, add a spacer....you get the picture. Patience is required.
The biggest difficulty I came against was holding the guide in the correct 12 o'clock position, while "leaning" on the tool to tighten the bottom bracket as well as possible. This was, I have to admit, a touch frustrating.
Once alignment is perfect, attach the crank, put the chain back together (if you had to break it) and you're just about done.
4. Final adjustment
 As you are removing a 44t chainring you may be able to take out a couple of chain links. Because I am running a 34t and my lowest gear on the back is a 36t it wasn't possible.
The penultimate step is to loosen the small screw in the guide body and adjust the vertical position. Run as low as possible without the crank or chain rubbing and tighten. Run through your gears while in the work stand and check everything runs smoothly and the alignment is spot-on.
5. Ride your bike
I'm assuming if you're reading this you know how to ride a bike so I won't bother explaining the technicalities!
There are many brands and types of single chainring guides and parts, this example was the best and most cost effective for me, but look around and become familiar with what is available before jumping in.
Then enjoy the simplicity and freedom of being released from the constraints of a front derailleur...
Ride hard!