Setting up a mountain bike cockpit can be a subjective exercise, yet there are some important adjustments that, if adhered to, will dramatically change how your bike feels, increase your comfort levels and also your ability to ride fast and confidently.
These tried and true methods are a great starting off point if you are new to riding or have simply been having difficulty getting that new bike to feel 'just right'. These are easy processes and are helpful in rebooting your riding position.
NOTE: We always recommend starting with a bike fit. Most reputable local bike shops offer a dizzying array of fit options and which you choose probably reflects how serious you ride. Check out these related articles for more information:
TOOLS REQUIRED:
- Torque wrench
- Allen keys
- Tape measure
- Grease (carbon grease if required)
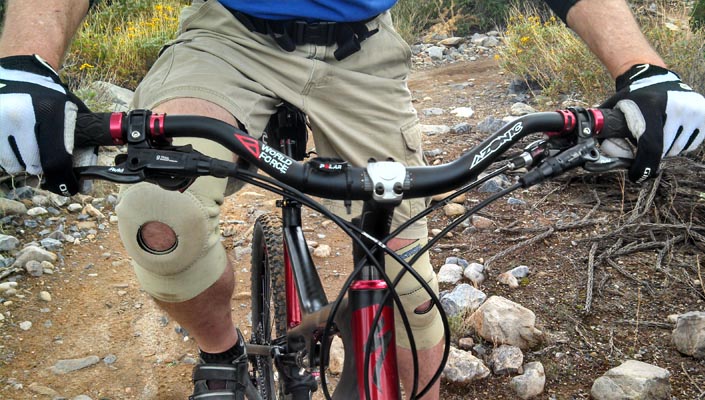
1. Bar rotation
Mountain bike handlebars come in a variety of widths with a confusing array of rise and sweep characteristics determined by the bars intended use. Simply put, wide handlebars with a large rise are used for freeride, all-mountain or downhill, while flatter, narrower bars are more for trail and XC.
Whatever handlebar you use, the best place to start when adjusting is with the rise section, (typically about an inch outbound from the stem), close to a vertical position. This creates a neutral setup from which later adjustments are easier and allows a baseline when positioning the controls. With the bar in this position it is also easy to see the backward sweep of your handlebar.
2. Tighten faceplate
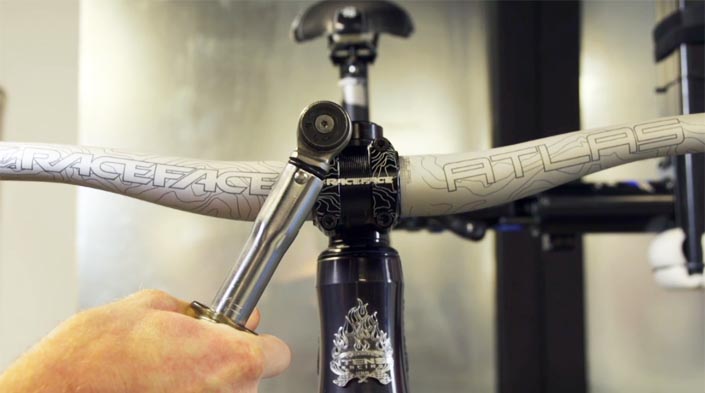
Once you have rotated your handle bar into position tighten the faceplate bolts. This should be done like the wheel nuts on a car: Start with a few turns on the top right bolt, then bottom left - top left, bottom right. Go around until it starts to nip up and check the faceplate is tightening equally at every bolt.

TIP: We have mentioned using a torque wrench, which is crucial particularly if you have carbon components. Carbon fibre can be extremely strong when used appropriately, but it can also weaken dramatically if abused or installed incorrectly. A handy tip is to use a carbon paste or grease. These compounds increase the bonding strength so less force is required which protects the carbon from damage from over tightening.
RELATED ARTICLE:
Upgrade your MTB bars. Here's why
MTB handlebars may seem a fairly innocuous component to upgrade, but sometimes a change to the cockpit can alter the way your bike rides for the better... READ MORE
3. Stem position
The stem position should obviously be aligned with the front wheel. This can be harder than it sounds! First line the stem and wheel up with the front wheel held between your knees facing the bike - then move to the rear of the bike and check from there. Take some time here as there is nothing more annoying than heading out for a ride with a slightly off centre stem!
NOTE: This adjustment should be accomplished with a slightly loose stem. To achieve this loosen the bolts holding the stem to the fork steerer. You may also need to loosen the headset nut minutely. When tightening start with the headset nut then tighten the stem bolts. Never tighten beyond recommended torque settings! If possible buy a torque wrench and become familiar with it. Most bolts on a bike cockpit require approx 3-6Nm.
4. Attach grips/bar ends
Grips with lock-on collars are your best friend in this department. They are simple to install and come in a variety of foam densities depending on how much hand cushioning you're after. Bar-ends are a bit old school these days, especially for general trail riding. They do offer an alternative hand position that can help with climbing but also pose a hazard if you ride narrow singletrack and accidently clip a tree... with a bar end there is no coming back!
Installing bar ends is also very simple. It is personal preference regarding the vertical position of the bar itself.
5. Brake lever position
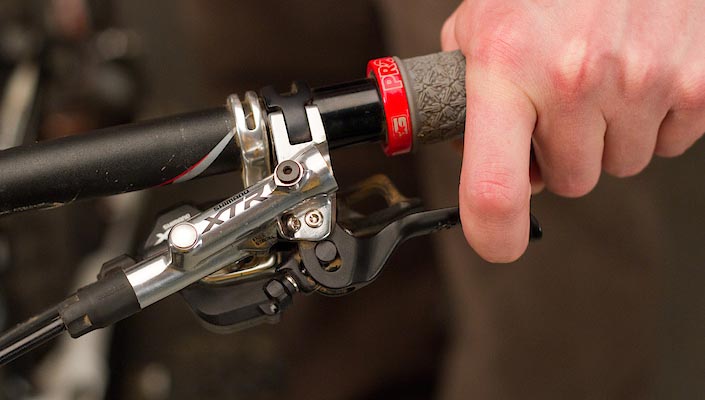
Firstly, the brake lever should sit inboard of the grip far enough so that there is just over an inch of lever overlapping the grip. This ensures your brake finger is aligned with the lever correctly when holding the grip. If there is too much lever/grip overlap you will be braking at a point too far along the lever which is inefficient and gives less control of brake modulation.
The brakes should be rotated so that the lever is aligned with the line of your arms. This helps prevent any extra pressure on the hands and wrists when applying the brakes while riding.
Once the lever is positioned and secured you can adjust the reach setting. Most mountain bike brakes come with a reach adjustment screw. Wind this in until a comfortable position is found.
6. Gear lever position
Once the brakes are positioned you can sort out the gear levers. Once again these should be located so that they are within easy reach of your fingers/thumb without interfering with your grip on the bars. This is typically inboard of the brake lever but depends on the brake/gear brand and design.
TIP: Use a measuring tape to check the location of the controls along the handlebar and adjust so everything is lined up perfectly. This will also help when adding extra accessories to the bar real estate like computers, suspension remote levers, etc.

RELATED ARTICLE:
The cheapest and easiest way to transform how your mountain bike handles singletrack
Introducing the cheapest and easiest way to completely transform the feel of your mountain bike... READ MORE